Yunus Emre
Software Engineer
Creating Dynamic Word and Excel with PowerApps

Creating dynamic documents using PowerApps automates your business processes, saving time and increasing productivity. In this article, I explain step by step how you can easily create Word and Excel documents by leveraging the power of SharePoint, Power Automate and PowerApps.
Dynamic Word and Excel Creation
In my previous articles, I talked about creating excel with flutter. Now I will talk about how we can do a similar process easily with powerapps.
First of all, I will not go too much into the beginning of powerapps in the content of the article. I continue by assuming that you have created the design and forms on the Powerapps side.
How to Create a Dynamic Word Document with PowerApps?
Let's start with word first. To create a dynamic word document in Powerapps, we need to open a document library in sharepoint. We can import the columns in this document library into the word document as it is. For this reason, when we assign the data we receive from the user in powerapps to the columns in the sharepoint document library, the process is almost complete. So how can we write data from powerapps to the document library;
For this, let's first create a word document to use as a template in the document library we have opened. Then let's create some columns to throw into this document. Our infrastructure is almost ready. Now we will throw the data we receive on the Powerapps side to Automate and from there we will write data to the columns in the document library we have opened. For this, I convert my data into JSON in Powerapps.
/*
Powerapps json oluşturarak akışa bu json verimizi gönderiyoruz ve dönüş olarak bir link alıyoruz. Daha sonra Launch komutu ile bu linki açıyoruz.
*/

Set(
    jsonData,
    JSON(
        {
            Name: Txt_Name.Value,
            Lastname: Txt_Lastname.Value,
            City: Txt_City.Value,
            AktifMi: Cb_AktifMi.Checked
        }
    )
);
Set(
    wordLink,
    'Dinamik-Word'.Run(jsonData).url
);
Launch(wordLink)
This code converted the data in the application into JSON and sent this JSON to the stream named “Dynamic Word”.It also saved a text returned from the stream in a variable named “wordLink”.Then it opened this link with the “Launch” command.
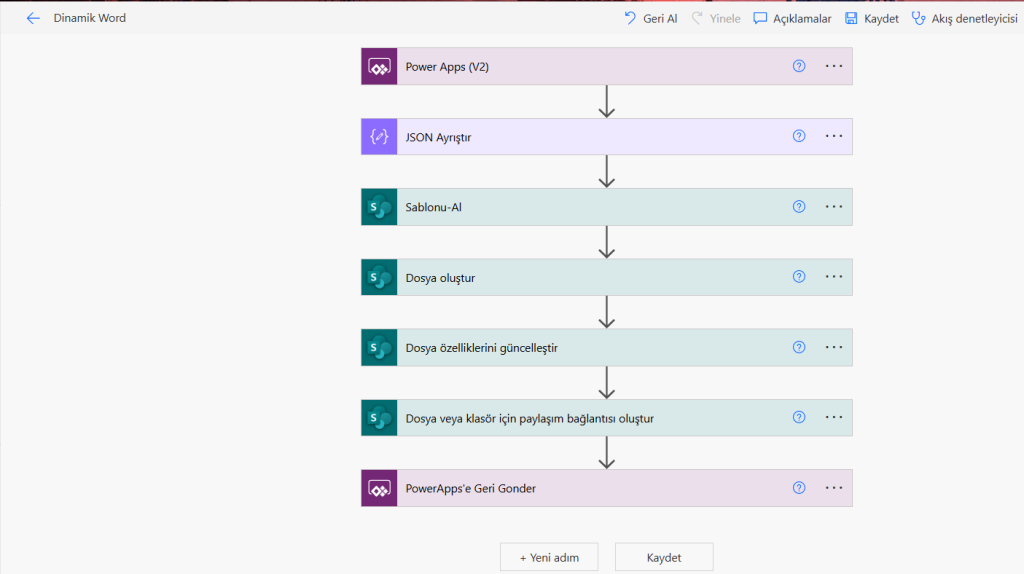
Now let's move on to the streaming part.In the flow, we first get the JSON data that will come from Powerapps.We can also get data one by one here, but when the number of data increases, it can be a problem. For this reason, I generally work with JSON. Then I access my data by parsing the incoming JSON file. Then I copy the template word document I created earlier in the document library. In the next step, I create new data with this copied document. Then I save my JSON data that comes as a parameter in the columns of the new data created. In this way, we have created a data in the sharepoint document library.

To write the columns in the Sharepoint library to the word document, we open the word document we added as a template. From the Insert section at the top, we click on the Document Property field in Quick Sections. Here we can see the columns we opened in sharepoint. You can add the column you want to the desired area of the word document.
How to Create Dynamic Excel with PowerApps?
Creating a dynamic excel is a bit more complicated. But you have more possibilities. In the word document we followed the progression PowerApps - Power Automate - Word, but in the excel phase we will follow the progression PowerApps - Power Automate - Excel Script - Excel. Excel scripts are special codes written for excel. I like it more than Word because it gives me more freedom. I can do almost everything I want very easily here.
- Let's create a JSON with our data again in Powerapps.
- Send the JSON data to Power Automate.
- Let's create an excel template in the Sharepoint document library.
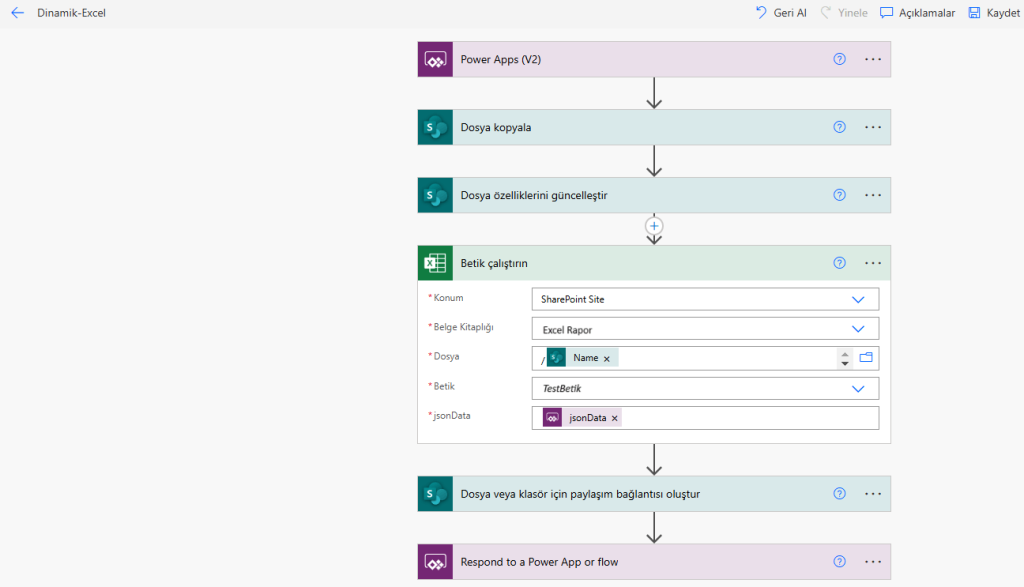
- Let's copy this template in our Automate flow and create a new excel.
- Then select Run script in Automate.

- At this stage we need to open our template Excel and write an Excel script. (Automate->New Script) When we save the excel script we wrote, it will become visible in the Script tab in the Run script area. Sample excel script is below.
interface KisiJson {
        Name: string;
        Lastname: string;
        City: string;
        AktifMi: boolean
}

// Ana fonksiyon
function main(workbook: ExcelScript.Workbook, jsonData: string) {
    // JSON stringini parse et
    let kisiJson: KisiJson = JSON.parse(jsonData);

    // Çalışma sayfasını seç
    let selectedSheet = workbook.getWorksheet("Sayfa1");

    // Verileri hücrelere yerleştir
    selectedSheet.getRange("C9").setValue(kisiJson.Name);
    selectedSheet.getRange("C10").setValue(kisiJson.Lastname);
    selectedSheet.getRange("D9").setValue(kisiJson.City);

    if(kisiJson.AktifMi === true)
    {
        selectedSheet.getRange("E9").setValue("✅");
    }
    else
    {
        selectedSheet.getRange("E9").setValue("❌");
    }
}- When we select the script we created on the automate side, we will be asked for parameters. Here we can do JSON parsing on the automate side, but my suggestion is to do it on the excel script side. Because I realized that the script works much faster in some operations.
- I send the JSON data from Powerapps to Automate, this time to the script.
- My script will take this JSON and process it into cells.
- After scripting in the stream, I create a share connection again and switch back to powerapps.
All these processes are completed in a very short time and the user can open the dynamic document. I have used only 3-4 data for example. In comprehensive projects, the number of data can increase a lot. Sometimes we can also create dynamic excel by defining an array in JSON. Even in these cases, the script completes quickly and fills the document without making the user wait too long.
Note: Using Excel scripts you can change the height, font, color of a cell. You can add new rows and thus create completely dynamic documents. For this reason, I use excel whenever possible, except in some cases.
We have realized the process of creating dynamic word and excel using the Microsoft power platform. These operations can be done in different ways. You can write the methods you use as a comment below
See you in the next article...
