
Yunus Emre
Software Engineer
How to Make Microsoft PowerApps Multilingual Application?
There are many different methods for Powerapps multilingual application. But today I'm going to write about my preferred method where we have full control.
PowerApps Multilingual Application
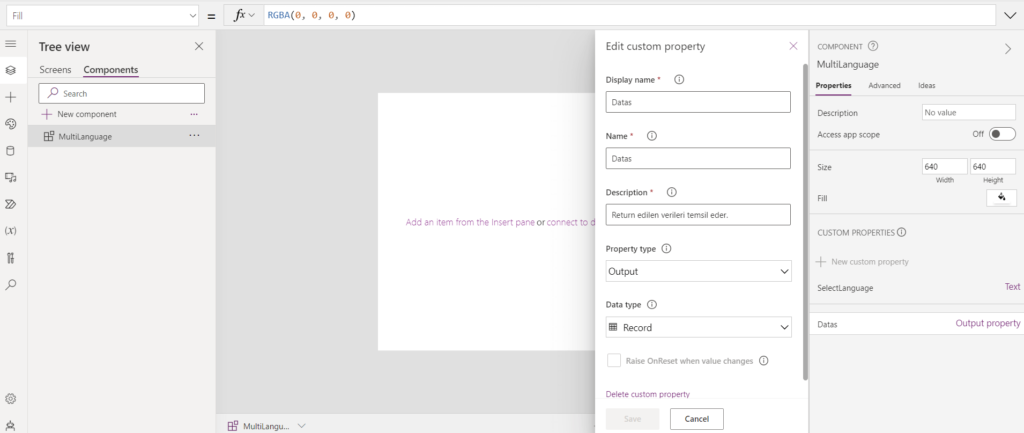
First, let's come to the editing screen of the application we opened in PowerApps You will see screens and components in the tree view area. We add a new component by entering the components. I added it and named it "MultiLanguage". Then we come to the properties of the component we added and add a new custom property. This field is just like the parameters of a function in hard coding languages. Thanks to this field, we can select the parameters coming to the component and the data that the component will return.
In the image below, I added a parameter called "SelectLanguage". Our component will receive a language selection from the user. It will send data according to this language selection.

Now let's set what data our component will send. We create a data called "Datas" that we will return.
Our component is almost ready. Now let's move to the coding side. We write the following code in the "OnReset" field of the component named "MultiLanguage" that we added before.
Set(
    varTranslations,
    Table(
        {
            SelectLanguage: "tr-tr",
            Datas: {
                UserName: "İsim",
                UserLastName: "Soyisim",
                Company: "Şirket"
            }
        },
        {
            SelectLanguage: "en-us",
            Datas: {
                UserName: "Name",
                UserLastName: "Surname",
                Company: "Company"
            }
        }
    )
)
This code will check whether the variable coming from the user is "tr-tr" or "en-us". I have 3 different yields, UserName, UserLastName and Company. You can increase this. Also, if you want to add a different language, you can add it in the same way.
Now the component we added again will have a function called "SelectLanguage". We write the following code to it. This "varLanguage" will be the variable that our user will change.
varLanguageFinally, we write the following code in the "Datas" function of my component.
LookUp(
    varTranslations,
    SelectLanguage = Self.SelectLanguage
).Datas
Now the component part is done. We can move to the screen of our application.
I added a "toggle" where the user can select the language. You can also do this with a button or dropdown. If the user activates the toggle, it will be "en-tr". If not, it will be "en-us".
Set(varLanguage,"tr-tr")Set(varLanguage,"en-us")Then we add our component (MultiLanguage) that we created from the insertion field above to the page. Now we can pull our data by adding 3 text fields.
As you can see in the video, our text fields change according to the selection. I wrote the following codes in our text fields respectively.
MultiLanguage_1.Datas.UserNameMultiLanguage_1.Datas.UserLastNameMultiLanguage_1.Datas.CompanyNow our application is ready. Apart from this method, there are other methods that you can translate automatically with the API. However, since I have full control over this method, I generally prefer this method.
See you in the next article...
Harika bir çözüm. Teşekkürler